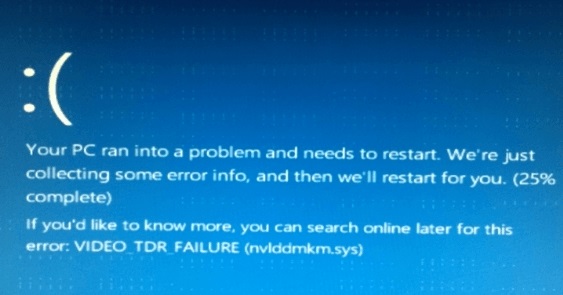
VIDEO_TDR_FAILURE (nvlddmkm.sys) is an error where the screen turns to complete blue and results in death. It occurs when you have update your Windows or have changed to a new driver.
As the technology advances requirements are increasing and updating of the technology has become mandatory.

Windows is a group of many Graphical Operation System. Windows is a powerful, popular tool and efficient tool as well. Updating your system is the basic and main aim for maintaining your Operating System for a longer time.
Read Also:
- Widevine Content Decryption Module Error
- Digital TV Tuner Device Registration Application
- WOW51900319 Error in World of Warcraft
- Your Windows License Will Expire Soon Error in Windows 10
- Steam Content File locked Error on Steam
How to Fix nvlddmkm.Sys Error on Windows 10
Many users have reported about VIDEO_TDR_FAILURE (nvlddmkm.sys) error and are struggling and contemplating trying to find the methods. So, here we are for you with some methods to solve Nvlddmkm.sys error.
If you come across an error message VIDEO_TDR_FAILURE with blue screen (BSOD), it indicates that driver related to Graphics Cards stops responding or malfunctioning. At that point of time system will restart automatically to prevent data loss and to restore the things to their default.
Below are some methods which will help you to fix Nvlddmkm.sys error on your system. Appropriate to your problem wisely choose your methods.
Method 1 – Reinstall Graphics Card Driver
Corrupted graphics card driver can lead to a major problem in Nvlddmkm.sys BSOD Windows 10 error. NVIDIA graphics card accompanies this issue. The best way is to reinstall the drivers as soon as the error pops up. The following steps will help you change the graphics card
Step 1 – Press Windows Key + R on the keyboard.
Step 2 – Then type “devmgmt.msc” in the dialogue box. Device Manager window will open.
Step 3 – Search for Device Adapters tab and double click it.
Step 4 – Then right-click on NVIDIA Graphics driver to uninstall it.
Step 5 – Confirm Device Uninstall window will pop up on the screen, click on OK, and search for Delete the driver software for this device before that.
Step 6 – Now, go to the official website and download and install the latest version of the driver again.
Step 7 – Search for the following address in your system C:\Windows\System32\Drivers & find nvlddmkm.sys. Right-click & rename it to nvlddmkm.sys.old.
Step 8 – Rename confirmation tab will pop up on the screen, press OK.
Step 9 – Then Find NVIDIA folder in C Drive of your computer system and copy & paste nvlddmkm.sy_ File to the desktop.
Step 10 – Press Windows Key + R on the keyboard.
Step 11 – Then type “cmd” in the dialogue box. Command Prompt window will open.
Step 12 – Type the given command in the following command prompt expand.exe nvlddmkm.sy_ nvlddmkm.sys
Step 13 – Now, navigate to C:\ drive & copy the newly created nvlddmkm.sys file.
Step 14 – Paste the copied file into the C:\Windows\System32\Drivers folder.
Step 15 – Restart your system to view the changes.
These steps should surely solve the issue. If not, then try out the other methods mentioned below.
Method 2 – Run a Disk Check on Your System
Many times the error may not cause by the corrupted graphics card it may occur due to defects in the disk check. Hence, it is necessary to run a disk check in order to solve the problem. The steps followed are for disk checking.
Step 1 – Press Windows Key + R on the keyboard.
Step 2 – Then type “cmd” in the dialogue box. Command Prompt window will open.
Step 3 – Type the given command in the following command prompt chkdsk /f c:
Step 4 – On hitting Enter, the system will ask you for permission to run a check at the next restarts. Type Y and hit Enter.
Step 5 – Once you hit the Enter, exit the command prompt, and Restart the computer system.
Step 6 – Now wait till the disk checking process to complete. It may prolly take 20 to 25 minutes.
Step 7 – After performing all the steps, errors will be displayed, if found. Rectify those errors.
Finally, when you have rectified the errors in the disk check, your system will not show video_tdr_failure nvlddmkm.sys in Windows 10. But, if you have not solved the issue yet, then you should try other methods as well.
Method 3 – Run a Memory Check on the System
If the above methods were not sufficient for you to fix the nvlddmkm.sys error, then it might be possible that your RAM is causing the error or it might have some issues. Thus, run a memory check to fix the issue. The steps which should be followed are:
Step 1 – Press Windows Key + R on the keyboard.
Step 2 – Then type “mdsched.exe” in the dialogue box. Windows Memory Diagnostic will pop up.
Step 3 – Now select either Restart now and check for problems (recommended) or Check for problems the next time I start my computer.
Step 4 – Now, wait till the Memory Check process to complete. It may prolly take 15 to 20 minutes.
Step 5 – After performing all the steps, errors will be displayed, if found. Rectify those errors using suitable methods.
Method 4 – Remove Any Conflicting Programs
This error nvlddmkm.sys may probably occur when there are recent installations programmers or drivers in your computer. The error can possibly be fixed by updating your programs to the latest versions or deleting the recently added programs. By applying this method, the error should be probably fixed. If you still face the error, then perform the below methods to fix the error.
Method 5 – Change the Graphics Card
Graphics cards are one of the biggest workhorses in your computer, especially if you do a lot of gaming. Gamers should upgrade their graphics cards every two to three years, though you can certainly stretch a card out longer than that. This error may occur when games or application are being overloaded in your graphics card. Removing the graphics card will solve nvlddmkm.sys error.
Method 6 – Update Your Windows
Step 1 – Press Windows Key + I on the keyboard. Windows Settings will open up.
Step 2 – Select on Update & Security from the options.
Step 3 – Click on Windows Update, which is situated at the left.
Step 4 – Search for Check Updates option. If updates are available, then update it.
Step 5 – Now, wait till the Windows complete the process. It may prolly take some time.
Step 6 – Reboot Windows and check if the VIDEO_TDR_FAILURE (nvlddmkm.sys) error is solved or not.
Also Read:
- VAC Was Unable to Verify the Game Session
- Confirm Form Resubmission (ERR_CACHE_MISS) Error on Chrome
- Modern Setup Host Has Stopped Working in Windows 10
- Steam Missing File Privileges Error in Steam
Conclusion
Hopefully, the above-mentioned methods will help you to solve the VIDEO_TDR_FAILURE (nvlddmkm.sys) error. It is advised that in order to improve your systems life you should keep on updating your Operating system, so these errors don’t bother you.


