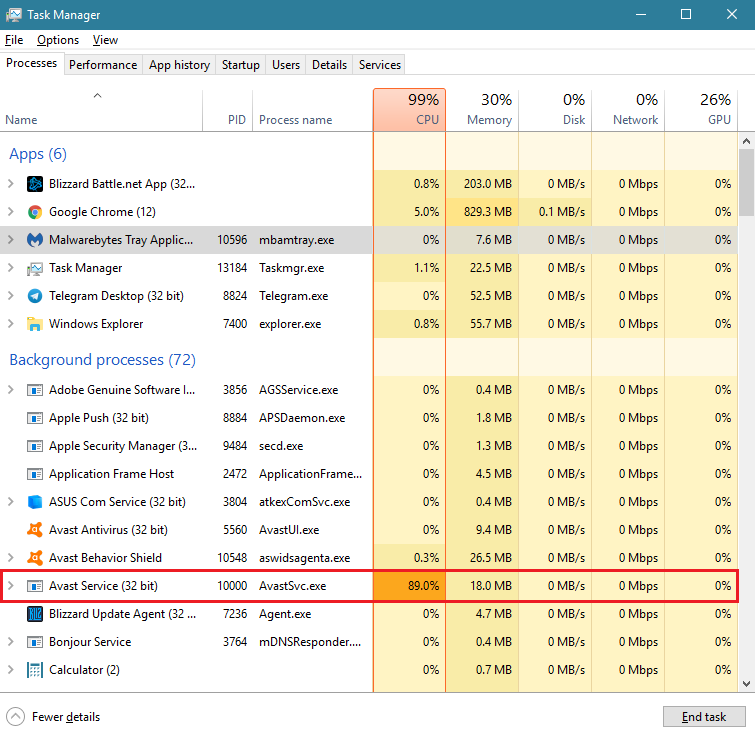
Antivirus software is no doubt an important software, but many a time they can become a bit annoying. The Avast Service High CPU usage is such an issue. Yes, Avast is a resource-demanding tool.
The antivirus software, like Avast, does a lot of work in the background. These include full system check-up, scanning for files, and repairing affected files, and removing viruses. All these processes are quite CPU intensive.

So, frequently you may observe that the CPU usage of Avast is over 50 percent. This will seriously affect the system performance while you are trying to do something very important. At times, it can be very frustrating also.
There is also a possibility that Avast is using too much CPU because of incorrect configuration of system settings or irregular entries in the Windows registry.
Read Also:
Contents
How to Fix Avast Service High CPU Usage Error
We are here with a bunch of troubleshooting steps that are really easy to use so that you can get around the issue of Avast occupying a major chunk of the CPU utilization.
Method 1 – Remove Avast Cleanup
Avast cleanup is a PC optimization tool. This tool will scan your PC to find apps or issues which are engaging the resources and interfering with the performance of the system. However, since the Avast cleanup works in real-time, it is intensive on the CPU. So, it is better that you uninstall this service. The steps for removing Avast Cleanup is detailed below.
Step 1: Open Avast by clicking on its icon or searching for it in the start menu.
Step 2: In Avast, navigate to the settings option and click on Components
Step 3: The components will be listed on the screen. Now click o the downward-facing arrow next to the component which you wish to remove (Cleanup in our case). Then click on the Uninstall component and then click on PK to confirm the uninstallation of the component.
Step 4: Restart your PC if Avast prompts you to do so.
Now, check if the CPU usage for Avast has gone to normal. If this did not work for you, then repeat the same process to uninstall the component called behavior shield. After doing this, check the CPU usage to see if there is any improvement.
Method 2 – Use Command Prompt
The frequent background scanning can cause a heavy load on RAM and CPU. So, in this method, we are going to change the scan frequency in order to reduce CPU usage. Thus, the background check will take place once in a while. This method is guaranteed to reduce the CPU usage but may cause some security issues.
Step 1: Select and launch the command prompt(cmd) as administrator by pressing the Windows key + X or right-clicking on the start menu. Alternatively, you can search for cmd on the search bar, then right-click on command prompt icon and then select ‘Run as administrator.’
Step 2: Type this command “C:\PtogramData\AvastSoftware” Avast and hit Enter. It will take you to the folder where you can execute further actions
Step 3: Open the file avast5.ini and insert the following command in the line [GrimeFighter]: ScanFrequency=999
Step 4: Save the file and restart your computer.
Now check the Avast Service High CPU usage to see if the problem is resolved or not. If this did not work for you, there is no problem. Just try out the next troubleshooting technique.
Method 3 – Get the Latest Avast
An outdated version of antivirus can cause problems. It is always better that you ensure that the antivirus software and virus definition database are up to date. The steps for updating Avast is given below:
Step 1: Open Avast antivirus by double-clicking at the icon or using the start menu.
Step 2: Find the Update tab on the left pane and click on it. You will find two update buttons – one for the virus definition database and another for the antivirus program.
Step 3: In most cases, just updating the virus, the definition is found to fix the problem. But it is a good practice that you update the antivirus program also. To do that clock on both the buttons. It may take some time. Just follow the on-screen instructions to successfully complete the updating process.
Now, once again, check if the CPU usage has become normal. If not, try the next method.
Method 4 – Avast Screensaver Scanning Even Though It Shouldn’t
Sometimes the Avast screensaver continues scanning even though the screensaver is not running. This is a futile process and creates an unnecessary burden on the CPU. It doesn’t happen consistently, but it is still a problem.
The problem is that you don’t know that it is happening because it does not show on the Avast interface. This is what you should do to solve this problem,
Step 1: Right-click on some random file and choose an Avast scan in the context menu.
Step 2: Then pop up window. Called scan result window pops up. You will be able to see a list of scans that are currently running in the system.
Step 3: In the list, locate Avast Screensaver scan and click n the stop button corresponding to it. This will stop the unwanted Screensaverscan.
Now check to see whether the CPU usage has become normal.
Method 5 – Repair Avast From Control Panel
If none of the above-mentioned solutions worked for you, you could repair the Avast installation. This method was found useful by many users in fixing the Avast service high CPU usage issue.
After you have repaired the installation, don’t forget to readjust the settings. To do all this, you should be logged in as an administrator.
Step 1: Search and select the control panel from the search bar. Alternatively, you can select the control panel by pressing Windows key + R and typing in ‘control panel‘ and then press Enter.
Step 2: Once you are in control panel and select to View as Category at the top right corner.
Step 3: Right under the Programs section, click on uninstall a Program.
Step 4: In case you are using the settings app, click on Apps will enlist all the installed programs on your PC.
Step 5: Now locate Avast from the list and click on Uninstall\Repair.
Step 6: The uninstall wizard will open. From the two options ‘Repair‘ and ‘Remove‘ select ‘Repair‘ and click Next.
Step 7: At this stage, we need confirmation. Confirming will restart Avast with the default settings with which it worked before the error started showing up.
Step 8: Once the process is completed, click on Finish. Now you can restart your computer to see if the Avast Service High CPU error still persists.
Read Also:
- Error Loading Player: No Playable Sources Found
- Windows Has Detected an IP Address Conflict
- Steam Screenshot Folder
Conclusion
This article details 5 solutions to the Avast Service High CPU usage problem faced by many Avast users. Try these methods to resolve your problem. These methods are testified by users on various forums. I hope you were able to fix the issue.


